Easy Easter Dirt Pudding Jars Recipe Fun
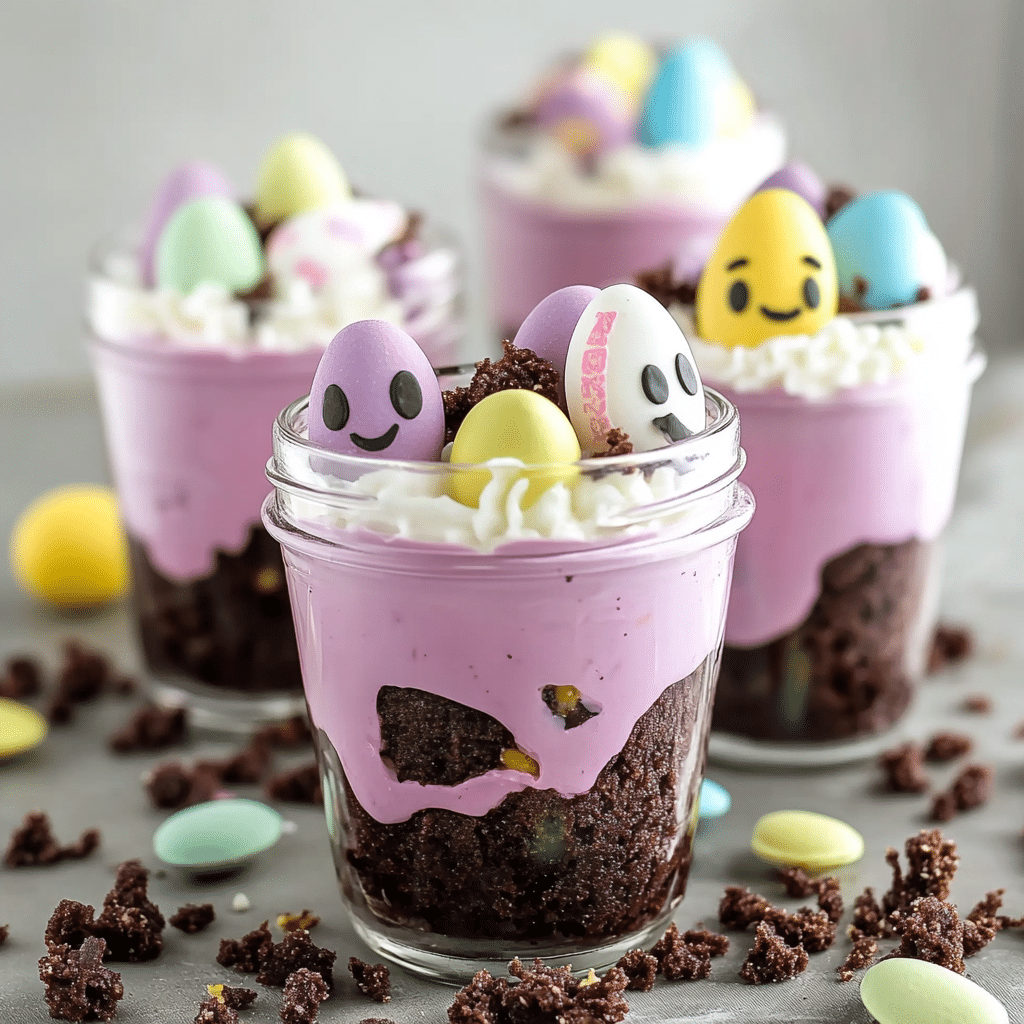
If you’re looking for a delightful and easy dessert that brings both nostalgia and festive fun to your Easter celebration, these Easter Dirt Pudding Jars are the perfect treat. This recipe combines creamy pudding, crunchy cookie crumbs, and playful candy “worms” all layered in charming individual jars, making it both visually appealing and absolutely delicious. It’s an ideal make-ahead dessert that kids love to help prepare and adults enjoy indulging in during holiday gatherings.
Why You’ll Love This Recipe
- Kid-Friendly Fun: The vibrant layers and gummy worms make this dessert a hit with children of all ages.
- Easy to Make: Minimal ingredients and no baking required mean you can whip these up quickly with little fuss.
- Perfect for Parties: Individually portioned jars make serving simple and mess-free for holiday gatherings.
- Customizable Treat: You can easily swap ingredients to accommodate dietary preferences or just mix up the flavors.
- Make-Ahead Convenience: Prepare these jars in advance, saving time on busy holiday days.
Ingredients You’ll Need
Gathering simple staples is all you need to create these festive Easter Dirt Pudding Jars. Each ingredient offers unique taste and texture to bring this delightful dessert to life.
- Instant Chocolate Pudding Mix: Provides the rich, creamy base that mimics “dirt” in the jars.
- Cold Milk: Essential to whip up the pudding to a smooth, luscious consistency.
- Crushed Chocolate Sandwich Cookies: Adds the crunchy, crumbly topping that looks like garden soil.
- Gummy Worm Candies: Iconic for a playful, Easter-themed touch that kids adore.
- Clear Glass Jars or Cups: Serves as a fun vessel to showcase the layered dessert beautifully.
Variations for Easter Dirt Pudding Jars
Feel free to make these Easter Dirt Pudding Jars your own! This recipe’s simplicity makes it perfect to personalize, whether you’re adjusting for dietary needs or enhancing flavors.
- Fruit Freshness: Add chopped strawberries or raspberries between layers for a juicy burst and natural sweetness.
- Non-Dairy Option: Use coconut or almond milk with a compatible pudding mix for a vegan-friendly treat.
- White Chocolate Twist: Substitute chocolate pudding with white chocolate pudding for a lighter color contrast.
- Peanut Butter Crunch: Sprinkle crushed peanut butter cookies instead of chocolate for a nutty twist.
- Adult Version: Mix a spoonful of coffee or hazelnut liqueur into the pudding for a grown-up flair.

How to Make Easter Dirt Pudding Jars
Step 1: Prepare the Pudding
Whisk together the instant chocolate pudding mix and cold milk as per package instructions until smooth and thickened. This creamy base sets the foundation for the dirt effect, so make sure it’s silky and lump-free.
Step 2: Crush the Cookies
Place chocolate sandwich cookies in a plastic bag and crush them into fine crumbs using a rolling pin or food processor. The crumbs should resemble soil texture to keep the jar’s playful garden look.
Step 3: Layer the Pudding and Crumbs
In your glass jars or cups, start with a layer of pudding, then sprinkle cookie crumbs on top. Repeat layering until the jar is nearly full, ending with a thick topping of crushed cookies to mimic rich dirt soil.
Step 4: Add the Gummy Worms
Nestle a few gummy worms on the final cookie crumb layer. You can let them peek out or bury them slightly for the “worm in dirt” effect that’s irresistible and thematic.
Step 5: Chill and Serve
Place the jars in the fridge for at least 1 hour to let the layers set and flavors meld together. Serve chilled for the best creamy, crunchy combination.
Pro Tips for Making Easter Dirt Pudding Jars
- Use Fresh Pudding: Prepare the pudding right before assembly to keep it smooth and fresh tasting.
- Don’t Over-Crush: Aim for a mix of fine crumbs and small chunks with the cookies for added texture.
- Layer Evenly: Consistent layering ensures every bite has a perfect balance of pudding and cookie crunch.
- Prepare Ahead: Make the jars a day early for deeper flavor infusion and easy entertaining.
- Decorate Creatively: Add mini chocolate eggs or pastel sprinkles alongside gummy worms for extra Easter flair.
How to Serve Easter Dirt Pudding Jars
Garnishes
Top with fresh mint leaves, colorful sprinkles, or edible flowers for a pretty, spring-inspired presentation that excites the eyes before the first bite.
Side Dishes
Pair these pudding jars with light fruit salads or crunchy carrot sticks to complement the sweet creaminess with fresh, natural flavors.
Creative Ways to Present
Serve the jars lined up on a rustic wooden tray or nestle each jar in Easter grass-filled baskets for a whimsical holiday touch that makes each dessert feel special.
Make Ahead and Storage
Storing Leftovers
Cover leftover Easter Dirt Pudding Jars tightly with lids or plastic wrap and refrigerate. They keep well for up to 3 days without losing the delicious texture.
Freezing
Avoid freezing this dessert as it can cause the pudding texture to separate and the cookie crumbs to become soggy once thawed, affecting the taste and appearance.
Reheating
This dessert is best served cold, so avoid reheating. If the pudding feels too firm after refrigeration, let it sit at room temperature for 10-15 minutes before serving for optimal creaminess.
FAQs
Can I use homemade pudding for Easter Dirt Pudding Jars?
Absolutely, homemade chocolate pudding works beautifully and adds a personal touch. Just ensure it’s thick enough for layering to maintain structure.
Are Easter Dirt Pudding Jars suitable for gluten-free diets?
Yes, by substituting the chocolate sandwich cookies with gluten-free versions, this dessert can easily be adapted for gluten sensitivities.
How long can I make Easter Dirt Pudding Jars in advance?
You can prepare and store these jars in the refrigerator for up to 2 days ahead of your event to save time and keep flavors fresh.
Can I replace the gummy worms with other candies?
Definitely! Jelly beans, mini chocolate eggs, or other Easter-themed candies add variety and keep the festive spirit alive.
What if I don’t have glass jars—can I use other containers?
Yes, clear plastic cups or small dessert bowls work just as well and make serving easy and attractive.
Final Thoughts
These Easter Dirt Pudding Jars are an absolute crowd-pleaser that combine fun, flavor, and festivity in one easy-to-make dessert. Whether you’re making them for family, friends, or a holiday party, they add that special springtime magic everyone will love. Give this recipe a try and watch how quickly these adorable jars disappear from the table!
Related Posts
- Why Italian Lemon Spread Delight Is a Must-Try
- Why Fruity Pebbles Cheesecake Tacos Are a Must-Try Treat
Easter Dirt Pudding Jars
Easter Dirt Pudding Jars are a fun, easy, and festive no-bake dessert perfect for holiday gatherings. Featuring creamy chocolate pudding layered with crunchy crushed cookies and playful gummy worms in individual jars, this kid-friendly treat is customizable and make-ahead, bringing joy and nostalgia to any Easter celebration.
- Prep Time: 15 minutes
- Cook Time: 0 minutes
- Total Time: 1 hour 15 minutes
- Yield: 6 individual jars 1x
- Category: Dessert
- Method: No Bake
- Cuisine: American
- Diet: Gluten Free (with gluten-free cookie options)
Ingredients
Main Ingredients
- 1 package Instant Chocolate Pudding Mix (3.9 oz)
- 2 cups Cold Milk
- 15–20 Chocolate Sandwich Cookies, crushed
- 1 small bag of Gummy Worm Candies
- Clear Glass Jars or Cups (6 jars/cups)
Optional Variations
- Chopped Strawberries or Raspberries (about 1 cup)
- Coconut or Almond Milk (2 cups) for non-dairy option
- White Chocolate Pudding Mix (1 package) as a substitute
- Crushed Peanut Butter Cookies (about 15-20) for nutty alternative
- Spoonful of Coffee or Hazelnut Liqueur (1 tbsp) for adult version
Instructions
- Prepare the Pudding: Whisk together the instant chocolate pudding mix and cold milk according to package instructions until smooth and thickened. Ensure the pudding is silky and lump-free for a creamy base.
- Crush the Cookies: Place chocolate sandwich cookies in a plastic bag and crush into fine crumbs using a rolling pin or food processor, aiming for a soil-like texture.
- Layer the Pudding and Crumbs: In each glass jar or cup, add a layer of pudding followed by a layer of cookie crumbs. Repeat the layers until the jars are nearly full, finishing with a thick cookie crumb topping.
- Add the Gummy Worms: Nestle a few gummy worms on the final cookie crumb layer, allowing them to either peek out or be slightly buried for a playful effect.
- Chill and Serve: Refrigerate the jars for at least 1 hour to let layers set and flavors meld. Serve chilled for the best creamy and crunchy combination.
Notes
- Use fresh pudding prepared right before assembly to keep the dessert smooth and fresh tasting.
- Don’t over-crush cookies; mix fine crumbs with small chunks for better texture.
- Layer evenly for a balanced bite of pudding and cookie crunch in every spoonful.
- Make the jars a day ahead to enhance flavor and ease entertaining.
- Decorate with mini chocolate eggs or pastel sprinkles for extra Easter charm.
Nutrition
- Serving Size: 1 jar (approx. 1 cup)
- Calories: 320
- Sugar: 28g
- Sodium: 150mg
- Fat: 12g
- Saturated Fat: 6g
- Unsaturated Fat: 4g
- Trans Fat: 0g
- Carbohydrates: 45g
- Fiber: 2g
- Protein: 4g
- Cholesterol: 15mg
Keywords: Easter dessert, pudding jars, no-bake dessert, kid-friendly, chocolate pudding, gummy worms, holiday treat