Easy Easter Bunny Coconut Tails Recipe Fun
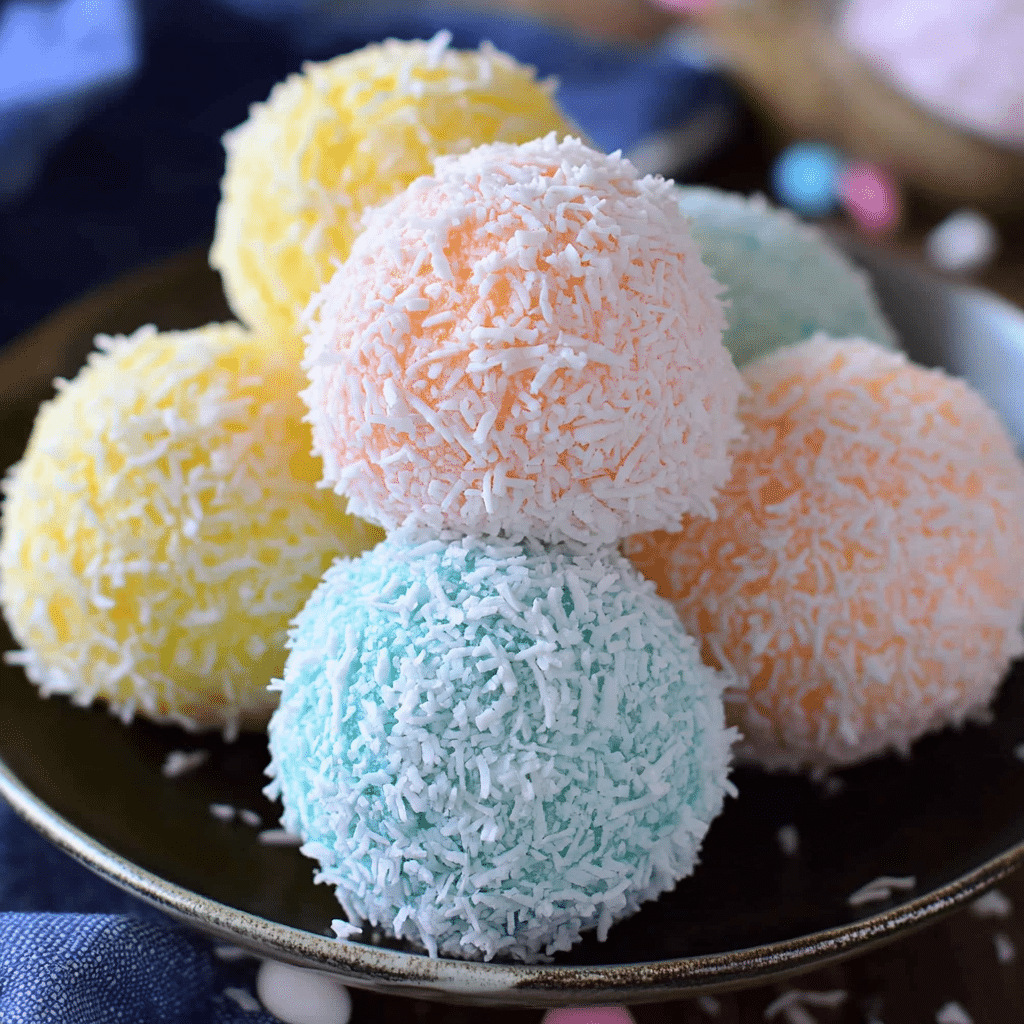
If you’re searching for an irresistibly fun and fluffy treat to celebrate the season, look no further than these Easter Bunny Coconut Tails. This recipe is delightfully simple yet impressive, combining the sweet, chewy texture of coconut with charming bunny-shaped designs that will enchant kids and adults alike. Perfect for festive gatherings, family baking sessions, or just a cozy snack, these coconut tails offer a fresh twist on classic treats that’s full of personality and flavor.
Why You’ll Love This Recipe
- Quick and Easy: This recipe comes together in no time, making it perfect for last-minute celebrations.
- Kid-Friendly Fun: Shaping the coconut tails into bunnies adds a playful touch everyone will enjoy.
- Minimal Ingredients: Using simple pantry staples means less prep and more tasty results.
- Perfect Texture: Chewy yet creamy, these treats strike a delightful balance in every bite.
- Customizable: Easy to personalize with different flavors or decorations to suit any preference.
Ingredients You’ll Need
Each ingredient plays an important role in crafting the perfect Easter Bunny Coconut Tails. From the lush coconut flakes that provide texture and aroma to the sweet condensed milk that binds everything together, every component is essential for delicious results.
- Sweetened shredded coconut: This forms the chewy, textured base for your tails.
- Sweetened condensed milk: Acts as the perfect binding agent while adding creamy sweetness.
- Vanilla extract: A splash enhances the overall flavor with warm, aromatic notes.
- Mini marshmallows: Optional, for an extra puffy and soft texture inside the tails.
- Chocolate chips or candy eyes: For decorating the bunny faces, bringing character and charm.
- Food coloring (optional): Add pastel shades to your coconut mixture for Easter-themed fun.
Variations for Easter Bunny Coconut Tails
Feel free to make this recipe your own! It adapts wonderfully to various dietary preferences and flavor cravings, offering plenty of ways to switch things up without sacrificing simplicity or taste.
- Chocolate Coconut Tails: Mix in cocoa powder or melted chocolate for a rich, chocolatey twist.
- Nutty Bunny Tails: Sprinkle chopped nuts like almonds or pecans into the mixture for added crunch.
- Vegan Version: Use coconut cream and maple syrup instead of condensed milk to keep it dairy-free.
- Fruit-Infused: Fold in finely chopped dried fruits such as cranberries or apricots for a chewy surprise.
- Colored Coconut: Dye the coconut with natural food coloring to make vibrant bunny tails that brighten up your Easter table.

How to Make Easter Bunny Coconut Tails
Step 1: Prepare the Coconut Mixture
In a large bowl, combine the sweetened shredded coconut with sweetened condensed milk and vanilla extract. Stir until all the coconut is evenly coated and sticky enough to hold shape. If you like, fold in mini marshmallows for extra fluffiness.
Step 2: Add Color (Optional)
If you want pastel-colored tails, divide the coconut mixture into separate bowls and add a few drops of food coloring to each. Mix gently to avoid clumping, then set aside for shaping.
Step 3: Shape the Bunny Tails
Using your hands, scoop small portions of the mixture and mold them into oval or tail-like shapes. For the bunny ears, pinch and shape smaller pieces, then gently attach them to the “tails” by pressing slightly. Place the shaped pieces on parchment paper-lined trays.
Step 4: Decorate
Attach chocolate chips or candy eyes to create cute bunny faces. You can also use small dots of melted chocolate as noses or whiskers. Let the tails rest for about 30 minutes to set before serving.
Pro Tips for Making Easter Bunny Coconut Tails
- Stickiness Factor: Make sure your hands are slightly damp when shaping to prevent the mixture from sticking.
- Chill Time: Refrigerate your coconut tails before serving to help them keep their shape longer.
- Use Fresh Coconut: Freshly shredded coconut enhances flavor and texture compared to packaged dry flakes.
- Customize Decorations: Small candies or edible markers can add personality to each bunny tail.
- Work Quickly: Coconut mixture can dry out if left too long, so shape and decorate promptly.
How to Serve Easter Bunny Coconut Tails
Garnishes
Dust the finished coconut tails lightly with powdered sugar for a snowy effect or sprinkle colored sugar crystals for festive sparkle that catches the eye instantly.
Side Dishes
Pair these sweet treats with fresh fruit slices, a scoop of vanilla ice cream, or warm chocolate fondue to elevate the flavor experience at your Easter celebration.
Creative Ways to Present
Arrange the bunny tails standing up in a festive basket lined with colorful tissue paper, or place them on mini cupcake liners for a charming party platter. You can also skewer them with decorative sticks for grab-and-go fun.
Make Ahead and Storage
Storing Leftovers
Store leftover Easter Bunny Coconut Tails in an airtight container at room temperature for up to 3 days to maintain freshness and softness.
Freezing
For longer storage, freeze the tails on a baking sheet first, then transfer them to a sealed freezer bag. They keep well for up to 2 months and thaw quickly when needed.
Reheating
These treats are best served cold or at room temperature, but if you prefer them slightly warm, let them sit out for 20 minutes or pop them in the microwave for just 5-7 seconds.
FAQs
Can I use unsweetened coconut for this recipe?
Yes, but you might want to add a little extra sweetener like honey or powdered sugar to balance the flavor since unsweetened coconut is less sweet.
Are Easter Bunny Coconut Tails gluten-free?
Absolutely! This recipe contains no gluten ingredients, making it naturally gluten-free and safe for most dietary needs.
Can I make these vegan?
Yes, substitute sweetened condensed milk with coconut cream and use a plant-based sweetener to keep it vegan while maintaining the creamy texture.
How long do these coconut tails last?
Stored properly in an airtight container, they stay fresh for up to 3 days at room temperature and longer if refrigerated or frozen.
Can I add other flavors to this recipe?
Definitely! Try adding almond extract, lemon zest, or even a touch of cinnamon to create unique flavor profiles that suit your taste.
Final Thoughts
These Easter Bunny Coconut Tails are a delightful, easy-to-make treat that brings playful joy and delicious flavor to any feast. Whether you’re baking with kids, entertaining guests, or just treating yourself to a sweet moment, this recipe is certain to become a seasonal favorite. So grab your ingredients and start crafting these adorable coconut bunnies that are as fun to make as they are to eat!
Related Posts
- Why Italian Lemon Spread Delight Is a Must-Try
- Why Fruity Pebbles Cheesecake Tacos Are a Must-Try Treat
Easter Bunny Coconut Tails
Easter Bunny Coconut Tails are a quick, easy, and fun treat combining sweetened shredded coconut, condensed milk, and vanilla to create chewy, creamy, bunny-shaped snacks perfect for festive Easter celebrations. These delightful coconut tails are customizable, kid-friendly, and great for both gatherings and cozy moments.
- Prep Time: 15 minutes
- Cook Time: 0 minutes
- Total Time: 15 minutes (+30 minutes resting time)
- Yield: 20-24 bunny tails 1x
- Category: Appetizers
- Method: No-bake
- Cuisine: American
- Diet: Gluten Free
Ingredients
Base Ingredients
- 2 cups sweetened shredded coconut
- 1/2 cup sweetened condensed milk
- 1 teaspoon vanilla extract
Optional Ingredients
- 1/2 cup mini marshmallows (for extra fluffiness)
- Chocolate chips or candy eyes (for decorating bunny faces)
- Food coloring (optional, for pastel colors)
Instructions
- Prepare the Coconut Mixture: In a large bowl, combine the sweetened shredded coconut with sweetened condensed milk and vanilla extract. Stir until the coconut is evenly coated and sticky enough to hold shape. If desired, gently fold in mini marshmallows for a puffier texture.
- Add Color (Optional): Divide the mixture into separate bowls and add a few drops of food coloring to each. Mix gently to achieve pastel shades without clumping. Set aside for shaping.
- Shape the Bunny Tails: Using your hands, scoop small portions and mold them into oval, tail-like shapes. Pinch smaller pieces to form bunny ears and gently attach them by pressing to the tails. Place shaped pieces on parchment paper-lined trays.
- Decorate: Attach chocolate chips or candy eyes to create bunny faces. Use small dots of melted chocolate as noses or whiskers if desired. Let the bunny tails rest about 30 minutes to set before serving.
Notes
- Make sure your hands are slightly damp when shaping to prevent the mixture from sticking.
- Refrigerate the coconut tails before serving to help them hold their shape longer.
- Using freshly shredded coconut enhances flavor and texture over packaged dry flakes.
- Customize decorations with small candies or edible markers for personality.
- Work promptly to shape and decorate as the mixture can dry out if left too long.
Nutrition
- Serving Size: 1 bunny tail (approx. 30g)
- Calories: 90
- Sugar: 12g
- Sodium: 15mg
- Fat: 3.5g
- Saturated Fat: 3g
- Unsaturated Fat: 0.3g
- Trans Fat: 0g
- Carbohydrates: 14g
- Fiber: 1g
- Protein: 1g
- Cholesterol: 5mg
Keywords: Easter treats, coconut tails, kid-friendly desserts, no-bake snacks, gluten free sweets