How to Make Krispies Easter Egg Nests Fast

If you’re looking for a sweet, colorful, and super quick treat to brighten up your Easter celebration, these Krispies Easter Egg Nests are exactly what you need. Combining the classic chewy texture of crispy rice treats with festive mini eggs nestled on top, this recipe is a joyful way to indulge without spending hours in the kitchen. Whether for a holiday party or just a fun snack, you’ll love how fast and easy these nests come together, making the perfect edible nest to celebrate spring and all things sweet.
Why You’ll Love This Recipe
- Lightning-fast preparation: Ready in under 20 minutes, so you can spend more time enjoying the holiday.
- Kid-friendly fun: Simple steps and colorful ingredients make it great for cooking with little helpers.
- Deliciously nostalgic: Combines the familiar taste of Rice Krispies Treats with festive Easter charm.
- Customizable sweetness: Easily tweak flavors and add-ins to suit your tastes and dietary preferences.
- Perfect party snack: Bite-sized and decorative, ideal for sharing or gifting during Easter gatherings.
Ingredients You’ll Need
Gathering your ingredients is a breeze because each one plays a crucial role in creating the right flavor, texture, and festive look for your Krispies Easter Egg Nests. These pantry staples come together to form a perfect foundation for your holiday treat.
- Rice Krispies cereal: The crunchy base providing that iconic crispy, chewy texture.
- Marshmallows: Melted down to bind the cereal for that soft, gooey consistency.
- Butter: Adds richness and prevents the marshmallows from sticking to the pan.
- Mini candy-coated chocolate eggs: The colorful, festive topping that turns the treat into a nest.
- Vanilla extract (optional): A splash adds a warm, inviting note to the mixture.
Variations for Krispies Easter Egg Nests
Feel free to play around with this recipe! It’s incredibly flexible and perfect to adapt whether you need to meet dietary needs, switch up flavors, or add some surprising textures.
- Chocolate Krispies Easter Egg Nests: Use Cocoa Krispies cereal or add cocoa powder for a chocolaty twist.
- Nut-free version: Simply omit any nuts and use safe allergy-friendly mini eggs or substitutions.
- Vegan nests: Replace butter with coconut oil and use vegan marshmallows to keep it plant-based.
- Peanut butter nests: Swirl in peanut butter to the melted marshmallow mix for extra flavor and gooeyness.
- Gluten-free option: Just make sure your crispy rice cereal is certified gluten-free.

How to Make Krispies Easter Egg Nests
Step 1: Prepare Your Workstation
Line a baking sheet with parchment paper or a silicone mat to keep your nests from sticking. This simple prep step makes cleanup a breeze and helps the nests form perfectly.
Step 2: Melt Butter and Marshmallows
In a large saucepan, melt the butter over low heat. Once melted, add the marshmallows and stir continuously until the mixture is smooth and fully melted. If you’re using vanilla extract, stir it in now to infuse your nest base with a sweet aroma.
Step 3: Mix in the Rice Krispies
Remove the melted marshmallow mixture from heat and immediately add the Rice Krispies cereal. Stir gently but thoroughly until every crisp is coated with that glossy, elastic marshmallow goodness. This will help your nests hold their shape.
Step 4: Shape the Nests
Using a spoon, drop small portions of the mixture onto your prepared baking sheet. Use the back of the spoon to create a small indentation or hollow in each mound, making a ‘nest’ shape perfectly cradling the mini eggs later.
Step 5: Add Mini Chocolate Eggs
While the nests are still warm and pliable, press 3-4 mini candy-coated chocolate eggs gently into each nest’s center. The warmth will help them stick, creating that charming Easter egg nest look.
Step 6: Let Them Set
Allow the nests to cool and firm up at room temperature for about 15-20 minutes. Once hardened, they’re ready to serve or package for gifting!
Pro Tips for Making Krispies Easter Egg Nests
- Use fresh marshmallows: Old marshmallows can make the mixture less gooey and harder to work with.
- Work quickly: Marshmallow mixture sets fast, so have your spoon and baking sheet ready before melting.
- Butter your spoon: Dipping your spoon in butter or lightly spraying with non-stick spray prevents sticking while shaping nests.
- Press the eggs gently: To avoid breaking the candy shells, press mini eggs softly into the nests.
- Storage tip: Store nests in an airtight container to maintain freshness and prevent them from drying out.
How to Serve Krispies Easter Egg Nests
Garnishes
Sprinkle a little colored sugar or pastel-colored sprinkles around the egg nests for a delicate sparkle. You can also drizzle melted white or dark chocolate on top for an extra special touch.
Side Dishes
Pair these sweet nests with simple items like fresh fruit slices or a light yogurt dip to balance the sweetness and add a refreshing element to your Easter spread.
Creative Ways to Present
Serve your Krispies Easter Egg Nests in mini cupcake liners for an easy-to-handle snack, or arrange them on a decorative platter lined with greenery to mimic a bird’s nest environment. They also make charming edible party favors when tied with a pastel ribbon.
Make Ahead and Storage
Storing Leftovers
Keep your nests fresh by storing them in an airtight container at room temperature for up to 3 days. Avoid refrigeration, as this can make them hard and less enjoyable to eat.
Freezing
If you want to prepare ahead of time, freeze the nests in a single layer on a tray first, then transfer to a freezer-safe container. This prevents them from sticking together and keeps them good for up to one month.
Reheating
These treats don’t really require reheating, but if you prefer them softer, a quick 5-10 second zap in the microwave will melt the centers slightly without losing their shape.
FAQs
Can I use regular marshmallows instead of mini ones?
Absolutely! Regular marshmallows work perfectly for melting down in the base, while mini marshmallows might melt faster but the taste remains the same.
Are Krispies Easter Egg Nests gluten-free?
Traditional Rice Krispies cereal contains barley malt, which is not gluten-free, but you can find gluten-free crispy rice cereals to make this treat safe for gluten-sensitive diets.
Can I substitute the butter for something else?
Yes, coconut oil is a great substitute that also adds a subtle tropical flavor and helps with a dairy-free or vegan version when paired with vegan marshmallows.
How long will Krispies Easter Egg Nests last?
Stored properly in an airtight container, they will stay fresh for up to 3 days at room temperature, perfect for quick consumption during the holiday.
Can I add other candies or toppings?
Definitely! Try mini jelly beans, colored sprinkles, edible glitter, or even chopped nuts to customize the look and taste of your nests.
Final Thoughts
Making Krispies Easter Egg Nests is such a joyful and stress-free way to add a festive, homemade touch to your Easter celebrations. With their irresistible texture, bright colors, and speedy preparation, these nests are sure to become a family favorite for many holidays to come. Get ready to impress your friends and loved ones with this sweet treat that tastes just as wonderful as it looks!
Related Posts
- Why Easter Crack Candy Is Irresistible This Year
- How to Make Perfect Candied Lemon Peel
- Why Thai Tea Mochi Crinkle Cookies Delight You
Krispies Easter Egg Nests
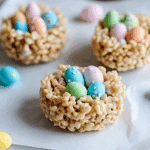
These Krispies Easter Egg Nests are a quick, colorful, and delightful treat perfect for Easter celebrations. Combining the classic chewy texture of Rice Krispies treats with festive mini candy-coated chocolate eggs, they are easy to make in under 20 minutes, kid-friendly, customizable, and perfect for parties or gifting.
- Prep Time: 10 minutes
- Cook Time: 5 minutes
- Total Time: 15 minutes
- Yield: 20-24 nests 1x
- Category: Appetizers
- Method: No-Bake
- Diet: Gluten Free (with gluten-free cereal)
Ingredients
Base Ingredients
- 6 cups Rice Krispies cereal (or gluten-free crispy rice cereal)
- 4 cups marshmallows (about 10 ounces)
- 3 tablespoons butter
- 1 teaspoon vanilla extract (optional)
Topping
- Mini candy-coated chocolate eggs (3-4 per nest)
Instructions
- Prepare Your Workstation: Line a baking sheet with parchment paper or a silicone mat to prevent sticking and make cleanup easier.
- Melt Butter and Marshmallows: In a large saucepan over low heat, melt the butter. Add marshmallows and stir continuously until fully melted and smooth. Stir in vanilla extract if using.
- Mix in the Rice Krispies: Remove the pan from heat. Immediately add Rice Krispies cereal and gently stir until every crisp is coated with the marshmallow mixture.
- Shape the Nests: Using a spoon (buttered or sprayed with non-stick spray to prevent sticking), drop small portions of the mixture onto the prepared baking sheet. Use the back of the spoon to create a small hollow or indentation in the center of each portion to form a nest shape.
- Add Mini Chocolate Eggs: While nests are still warm and pliable, gently press 3-4 mini candy-coated chocolate eggs into the center of each nest.
- Let Them Set: Allow the nests to cool and firm at room temperature for 15-20 minutes before serving or packaging.
Notes
- Use fresh marshmallows for better gooey texture.
- Work quickly as marshmallow mixture sets fast.
- Butter your spoon or spray with non-stick spray when shaping nests to prevent sticking.
- Press mini eggs gently to avoid cracking the candy shells.
- Store nests in an airtight container at room temperature for up to 3 days.
- Freeze nests in a single layer on a tray before transferring to a freezer-safe container to prevent sticking. Good for up to one month.
- No refrigeration to avoid hardening.
- To soften, microwave nests for 5-10 seconds.
Nutrition
- Serving Size: 1 nest
- Calories: 130
- Sugar: 10g
- Sodium: 100mg
- Fat: 4g
- Saturated Fat: 2.5g
- Unsaturated Fat: 1g
- Trans Fat: 0g
- Carbohydrates: 22g
- Fiber: 0.3g
- Protein: 1g
- Cholesterol: 10mg
Keywords: Easter, Rice Krispies Treats, Easter Egg Nests, No-Bake, Kid-Friendly, Quick Treat, Gluten-Free Option