Stained Glass Cookies
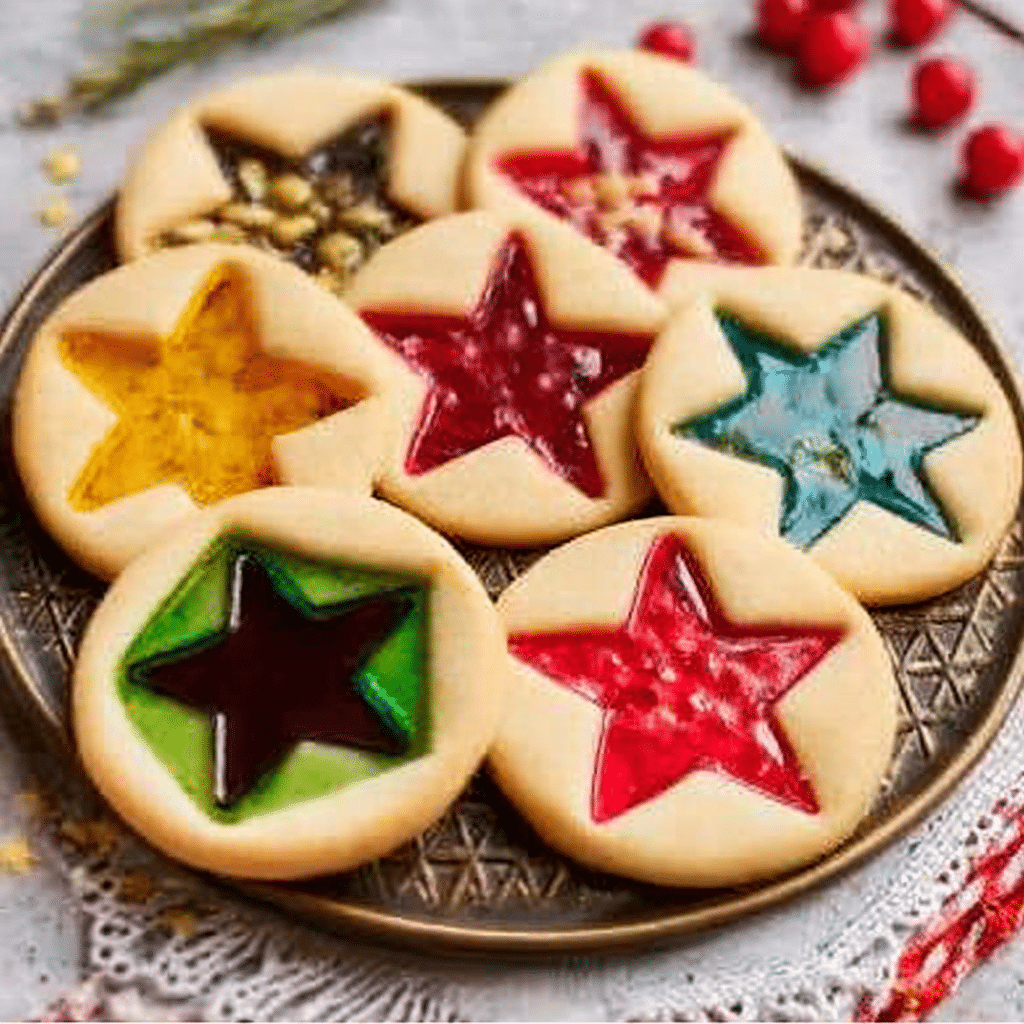
If you’re looking for a delightful baking project that combines artistry with taste, Stained Glass Cookies are just what you need. These charming treats feature colorful, translucent centers like miniature works of edible art that catch the light and wow any crowd. With a crisp buttery cookie frame surrounding vibrant, jewel-like candy centers, Stained Glass Cookies bring both beauty and flavor to your table — making your next gathering truly unforgettable.
Why You’ll Love This Recipe
- Visual Delight: The vibrant, see-through candy centers create a dazzling stained glass effect perfect for any occasion.
- Simple Ingredients: Made with everyday pantry staples, these cookies are easy to craft without complicated shopping lists.
- Kid-Friendly Fun: Cutting out shapes and filling the centers is a fun activity that little helpers will enjoy.
- Customizable Design: Use your favorite cookie cutters and colorful hard candies to make unique patterns every time.
- Perfect Gift Idea: Their festive appearance and delicious taste make them wonderful homemade gifts.
Ingredients You’ll Need
This classic Stained Glass Cookies recipe calls for a few simple ingredients that each play a key role in texture, flavor, and that glossy candy center. From the buttery dough to the sparkling candy shards, everything comes together effortlessly.
- All-purpose flour: Provides the sturdy base for a crisp and tender cookie shell.
- Unsalted butter: Adds richness and contributes to a delicate, melt-in-your-mouth texture.
- Sugar: Sweetens the dough perfectly, balancing the tangy candy centers.
- Egg yolk: Binds ingredients and adds a lovely golden hue to the cookie dough.
- Vanilla extract: Enhances flavor with a warm, comforting aroma.
- Assorted hard candies: Melted to create the signature stained glass effect and vibrant translucent centers.
- Salt: Just a pinch to balance out the sweetness and elevate flavors.
Variations for Stained Glass Cookies
One of the best parts about making Stained Glass Cookies is how adaptable they are. Whether you want to tweak the taste, accommodate dietary needs, or add an extra creative touch, there’s a variation for everyone.
- Gluten-Free Option: Swap in gluten-free flour for a safe alternative without sacrificing texture.
- Flavor Twists: Add citrus zest, almond extract, or spices like cinnamon for a personalized flavor boost.
- Holiday Themes: Use seasonal-shaped cookie cutters and coordinate candy colors to match festivities.
- Sugar-Free Version: Use sugar-free hard candy available in specialty stores for a diabetic-friendly option.
- Vegan Adaptation: Replace butter with a plant-based alternative and use egg replacers for a vegan-friendly treat.

How to Make Stained Glass Cookies
Step 1: Prepare the Dough
Start by creaming the softened unsalted butter with sugar until light and fluffy. Add the egg yolk and vanilla extract, mixing thoroughly. Gradually blend in the all-purpose flour and a pinch of salt until a smooth dough forms. Chill the dough wrapped in plastic for at least 30 minutes to make rolling easier.
Step 2: Roll Out and Cut Shapes
On a floured surface, roll the chilled dough to about 1/4 inch thickness. Use your favorite cookie cutters to cut out shapes. Then, with a smaller cutter, create a window in the center of half the cookies—this is where the colorful candy will shine through.
Step 3: Prepare the Candy Centers
Crush assorted hard candies into small pieces using a rolling pin or food processor. Place a spoonful of crushed candy into each center window on the uncut cookie halves.
Step 4: Assemble the Cookies
Carefully place the cookie with the candy center on a baking sheet lined with parchment paper. Gently top each with a whole cookie (without a window) to sandwich the candy center. Press lightly along the edges to seal.
Step 5: Bake and Cool
Bake the cookies at 350°F (175°C) for about 8-10 minutes, or until the edges begin to turn golden and the candy center melts completely into a glossy, translucent pane. Let the cookies cool fully on the baking sheet to harden the stained glass centers before moving.
Pro Tips for Making Stained Glass Cookies
- Use the right candy: Choose hard candies that melt smoothly like Jolly Ranchers or Lifesavers for vibrant colors and a glass-like effect.
- Chill dough well: Properly chilled dough reduces spreading during baking, keeping shapes crisp and well-defined.
- Crush candies evenly: Uniform candy pieces ensure a consistent melt and smooth stained glass window.
- Watch baking time closely: Remove cookies just as edges turn golden to avoid burning the candy centers.
- Use parchment paper: Prevents sticking and makes cleanup a breeze while keeping the colors bright.
How to Serve Stained Glass Cookies
Garnishes
Sprinkle a little powdered sugar over the finished cookies to add a delicate snowy effect that enhances their colorful centers beautifully.
Side Dishes
Pair these dazzling cookies with a cup of warm tea, hot cocoa, or even a glass of cold milk to balance sweet and rich flavors perfectly.
Creative Ways to Present
Arrange the cookies on a clear glass platter with fairy lights underneath to really make those stained glass centers sparkle with glowing colors, captivating guests at any party.
Make Ahead and Storage
Storing Leftovers
Keep leftover Stained Glass Cookies in an airtight container at room temperature for up to one week to maintain crispness and vibrant color.
Freezing
Freeze the cookies in a single layer on a baking sheet, then transfer to a freezer-safe container or bag for up to three months. Thaw at room temperature before serving.
Reheating
Warm cookies slightly in a low oven (about 300°F/150°C for 5 minutes) if you want to soften the candy centers again, but avoid overheating to prevent melting or discoloration.
FAQs
Can I use any type of candy for the center?
It’s best to use clear, hard candies like Jolly Ranchers or Lifesavers that melt evenly and create that pretty stained glass effect without cloudiness.
Why did my candy centers crack or not turn out smooth?
Uneven crushing or uneven heat during baking can cause cracking; ensure candies are crushed into similar-sized pieces and bake at the right temperature for even melting.
Can I make these cookies gluten-free?
Absolutely! Just substitute all-purpose flour with your favorite gluten-free flour blend to enjoy the same delicious results.
How do I prevent the cookies from spreading too much?
Chilling the dough thoroughly before baking and avoiding too thin rolling will keep cookie shapes crisp and prevent excessive spreading.
Are Stained Glass Cookies suitable for kids to make?
Definitely! Kids love cutting shapes and placing the candy centers, but adult supervision is recommended for handling hot baked cookies and melted candy.
Final Thoughts
These Stained Glass Cookies aren’t just a treat to eat — they’re a joyful project, a colorful centerpiece, and a delicious way to share warmth and creativity with friends and family. Once you bake your first batch, you’ll find endless ways to personalize and brighten your cookie experience. So grab your cookie cutters and favorite candies, and start creating your own shimmering masterpieces today!
Related Posts
PrintStained Glass Cookies

Stained Glass Cookies are charming, buttery treats featuring crisp cookie frames with vibrant, translucent candy centers that capture light and delight any crowd. Made with simple pantry staples and easily customizable, these cookies are perfect for gifting, holidays, or fun baking projects with kids.
- Prep Time: 40 minutes
- Cook Time: 8-10 minutes
- Total Time: 50 minutes
- Yield: About 24 cookies 1x
- Category: Dessert
- Method: Baking
- Cuisine: American
- Diet: Gluten Free (if using gluten-free flour)
Ingredients
For the Dough
- 2 1/2 cups all-purpose flour (or gluten-free flour blend)
- 1 cup unsalted butter, softened
- 3/4 cup sugar
- 1 large egg yolk
- 1 teaspoon vanilla extract
- Pinch of salt
For the Candy Centers
- Assorted hard candies (such as Jolly Ranchers or Lifesavers), crushed into small pieces
Instructions
- Prepare the Dough: Start by creaming the softened unsalted butter with sugar until light and fluffy. Add the egg yolk and vanilla extract, mixing thoroughly. Gradually blend in the all-purpose flour and a pinch of salt until a smooth dough forms. Chill the dough wrapped in plastic for at least 30 minutes to make rolling easier.
- Roll Out and Cut Shapes: On a floured surface, roll the chilled dough to about 1/4 inch thickness. Use your favorite cookie cutters to cut out shapes. Then, with a smaller cutter, create a window in the center of half the cookies—this is where the colorful candy will shine through.
- Prepare the Candy Centers: Crush assorted hard candies into small pieces using a rolling pin or food processor. Place a spoonful of crushed candy into each center window on the uncut cookie halves.
- Assemble the Cookies: Carefully place the cookie with the candy center on a baking sheet lined with parchment paper. Gently top each with a whole cookie (without a window) to sandwich the candy center. Press lightly along the edges to seal.
- Bake and Cool: Bake the cookies at 350°F (175°C) for about 8-10 minutes, or until the edges begin to turn golden and the candy center melts completely into a glossy, translucent pane. Let the cookies cool fully on the baking sheet to harden the stained glass centers before moving.
Notes
- Use hard candies like Jolly Ranchers or Lifesavers for vibrant colors and smooth melting.
- Chill dough well to reduce spreading and keep shapes crisp.
- Crush candies evenly for consistent melting and smooth stained glass effect.
- Watch baking time closely to avoid burning or cracking of candy centers.
- Use parchment paper to prevent sticking and maintain bright colors.
- For gluten-free, substitute all-purpose flour with gluten-free flour blend.
- For vegan version, replace butter with plant-based alternative and use an egg replacer.
Nutrition
- Serving Size: 1 cookie
- Calories: 150
- Sugar: 12g
- Sodium: 40mg
- Fat: 8g
- Saturated Fat: 5g
- Unsaturated Fat: 3g
- Trans Fat: 0g
- Carbohydrates: 18g
- Fiber: 0.5g
- Protein: 1g
- Cholesterol: 30mg
Keywords: Stained Glass Cookies, colorful cookies, holiday cookies, gluten-free cookies, kid-friendly baking, hard candy cookies, festive treats, baked gifts