Why Waffled Grilled Cheese is a Must-Try Snack

Discover the crispy, cheesy delight of Waffled Grilled Cheese, the ultimate snack that’s quick, easy, and irresistibly tasty! This innovative twist on the classic grilled cheese uses a waffle iron to create golden, crunchy pockets of melted cheese and buttery bread that are utterly addictive. Whether you’re looking for a snack on the go or a comforting treat, Waffled Grilled Cheese combines simplicity with flavor in a way that makes it impossible to resist.
Why You’ll Love This Recipe
- Crunchy Texture: The waffle iron crisps the bread evenly, creating a satisfying crunch unlike traditional grilled cheese.
- Quick Cooking: It takes just minutes to prepare and cook, perfect for busy days or spontaneous cravings.
- Melty Cheese Heaven: The melted cheese pockets throughout deliver gooey, savory goodness in every bite.
- Mess-Free Snack: The waffle iron seals the sandwich edges, keeping fillings contained and your hands clean.
- Endless Customization: You can easily swap cheeses, breads, or add fillings to suit your flavor preferences.
Ingredients You’ll Need
The magic of Waffled Grilled Cheese starts with simple, familiar ingredients that all play a role in flavor and texture. Each element, from buttery bread to rich cheese, perfectly balances crunch with creaminess for the ultimate snack experience.
- Bread: Use thick slices like sourdough or country white for the best structure and crunch.
- Cheese: Sharp cheddar melts beautifully, but mozzarella or Gruyère are excellent alternatives for different flavors.
- Butter: Softened butter brushed on the bread edges adds that golden crisp and buttery richness.
- Optional Fillings: Consider thin slices of tomato or cooked bacon for added taste and texture.
Variations for Waffled Grilled Cheese
Feel free to customize your Waffled Grilled Cheese to match your mood, dietary needs, or pantry supplies. This snack’s versatility means you can easily experiment to find your perfect combo.
- Vegan Style: Use dairy-free cheese and vegan butter for a cruelty-free crunch.
- Spicy Kick: Add sliced jalapeños or a sprinkle of cayenne pepper to spice things up.
- Sweet and Savory: Incorporate sliced apples or fig jam for a deliciously unexpected layer.
- Protein Boost: Include turkey slices or ham inside for a heartier snack.
- Gluten-Free: Swap bread for a gluten-free version to accommodate allergies or sensitivities.

How to Make Waffled Grilled Cheese
Step 1: Prepare Your Ingredients
Gather your bread, cheese, and any optional fillings. Butter one side of each slice of bread lightly but evenly—this side will be pressed against the waffle iron for that perfect crispy finish.
Step 2: Assemble the Sandwich
Place one slice of bread, buttered side down, on a clean surface. Add a generous layer of cheese and any fillings on top, then cover with the second slice of bread, buttered side facing up.
Step 3: Preheat the Waffle Iron
Plug in your waffle iron and let it reach medium-high heat. A well-heated iron ensures even cooking and those iconic waffle marks.
Step 4: Cook the Sandwich
Place the assembled sandwich onto the waffle iron and close the lid gently. Cook for 3 to 5 minutes or until the bread is golden brown and the cheese melts thoroughly.
Step 5: Serve and Enjoy
Carefully remove your Waffled Grilled Cheese using a spatula, let it cool slightly, then slice and serve while warm to enjoy the gooey, crispy perfection.
Pro Tips for Making Waffled Grilled Cheese
- Even Buttering: Spread butter evenly and thinly on both sides to prevent burning and ensure crispness.
- Cheese Selection: Combine cheeses with different melting points for a richer taste and texture contrast.
- Avoid Overstuffing: Too many fillings can prevent even cooking and cause mess inside the iron.
- Use Parchment Paper: If your waffle iron tends to stick, place parchment paper under the sandwich to keep cleanup easy.
- Cooling Time: Let the sandwich sit for 1-2 minutes after cooking so the cheese thickens slightly, making it easier to eat.
How to Serve Waffled Grilled Cheese
Garnishes
Fresh herbs like parsley or chives sprinkled on top add brightness and a pop of color, enhancing presentation and flavor without overpowering the cheesy goodness.
Side Dishes
A bowl of tomato soup is a classic companion, but crispy fries, a simple green salad, or even pickles make fantastic sides that balance the richness.
Creative Ways to Present
Cut the sandwich into bite-sized squares and serve with a variety of dipping sauces such as BBQ, mustard, or creamy ranch for an inviting appetizer or party snack.
Make Ahead and Storage
Storing Leftovers
Wrap leftover Waffled Grilled Cheese tightly in foil or store in an airtight container in the refrigerator. Consume within 2 days for optimum freshness and flavor.
Freezing
Freeze sandwiches individually wrapped in plastic wrap and then foil. They keep well for up to 1 month, perfect for quick snacks later on.
Reheating
Reheat in a toaster oven or waffle iron to restore crispiness and melty cheese – avoid microwaving as it makes the bread soggy.
FAQs
What type of cheese works best for Waffled Grilled Cheese?
Cheeses that melt well, such as cheddar, mozzarella, or Gruyère, are ideal. Combining a couple of cheeses can add extra flavor and texture.
Can I make Waffled Grilled Cheese without a waffle iron?
This recipe specifically uses a waffle iron for its signature texture, but a panini press or regular grill can offer a similar, though less crispy, result.
Is Waffled Grilled Cheese healthy?
While it is a comfort snack high in calories due to cheese and butter, you can modify it with whole-grain bread and lighter cheese options to make it more nutritious.
How long does it take to cook Waffled Grilled Cheese?
Typically, it cooks in about 3 to 5 minutes in a preheated waffle iron, making it a speedy snack or quick meal option.
Can I add other fillings to Waffled Grilled Cheese?
Absolutely! Ingredients like tomatoes, bacon, or even avocado can be added to customize the flavor and texture to your liking.
Final Thoughts
If you haven’t tried Waffled Grilled Cheese yet, you’re missing out on a ridiculously tasty and fun twist on a comfort classic. The marriage of crispy edges and melty cheese is a party in every bite, and the recipe is forgiving, fast, and endlessly adaptable. Give it a go—you just might find your new favorite snack!
Related Posts
- Why Bacon Chicken Ranch Wrap Is a Must-Try Meal
- Why Jalapeño Popper Grilled Cheese Steals the Show
- How to Make Smash Chicken Burger with Spicy Mayo & Bacon
Waffled Grilled Cheese
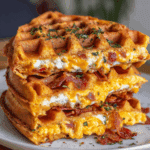
Waffled Grilled Cheese is a quick, easy, and irresistibly tasty snack that reinvents the classic grilled cheese sandwich by cooking it in a waffle iron. This method produces golden, crunchy pockets of melted cheese and buttery bread, delivering a satisfying crunch and gooey cheese in every bite. Perfect for a comforting treat or a snack on the go, this recipe is customizable, mess-free, and ready in just minutes.
- Prep Time: 5 minutes
- Cook Time: 3 to 5 minutes
- Total Time: 8 to 10 minutes
- Yield: 1 sandwich 1x
- Category: Appetizers
- Method: Baking
- Cuisine: American
- Diet: Gluten Free
Ingredients
Bread
- 2 thick slices of sourdough or country white bread
Cheese
- 2 to 3 ounces sharp cheddar cheese (or mozzarella or Gruyère as alternatives)
Butter
- 2 tablespoons softened butter for spreading on bread edges
Optional Fillings
- Thin slices of tomato
- Cooked bacon strips
Instructions
- Prepare Your Ingredients: Gather your bread, cheese, and any optional fillings. Lightly but evenly butter one side of each bread slice; this buttered side will be pressed against the waffle iron to achieve the perfect crispy finish.
- Assemble the Sandwich: Place one slice of bread buttered side down on a clean surface. Add a generous layer of cheese and any optional fillings on top. Cover with the second slice of bread, buttered side facing up.
- Preheat the Waffle Iron: Plug in your waffle iron and allow it to reach medium-high heat. A well-heated iron is crucial for even cooking and creating those iconic waffle marks.
- Cook the Sandwich: Place the assembled sandwich onto the waffle iron and gently close the lid. Cook for 3 to 5 minutes or until the bread is golden brown and the cheese is fully melted.
- Serve and Enjoy: Carefully remove the Waffled Grilled Cheese using a spatula. Let it cool for 1-2 minutes so the cheese thickens slightly, then slice and serve warm to experience the gooey, crispy perfection.
Notes
- Spread butter evenly and thinly on both sides of bread to prevent burning and promote crispiness.
- Mix cheeses with different melting points to enhance taste and texture contrast.
- Avoid overstuffing with fillings to ensure even cooking and prevent mess inside the waffle iron.
- If your waffle iron sticks, place parchment paper under the sandwich for easier cleanup.
- Allow the sandwich to rest briefly after cooking to let the cheese set for easier eating.
Nutrition
- Serving Size: 1 sandwich
- Calories: 400
- Sugar: 2g
- Sodium: 600mg
- Fat: 25g
- Saturated Fat: 14g
- Unsaturated Fat: 8g
- Trans Fat: 0g
- Carbohydrates: 30g
- Fiber: 2g
- Protein: 15g
- Cholesterol: 60mg
Keywords: waffled grilled cheese, crispy grilled cheese, waffle iron sandwich, quick snack, cheesy snack, melted cheese sandwich